I just wanted to let everyone know that I will not be posting again until after Christmas. I will be induced tomorrow and will not get out of the hospital until Thursday or Friday and then Christmas will be here. So it will be the week after Christmas when I post again. I will post with pictures of finished projects as well as pictures of our daughter.
I hope that everyone has a wonderful week and a Merry Christmas.
Lacie

Wednesday, December 22, 2010
Tuesday, December 21, 2010
Tuesdays Recipe - Whole Wheat Chocolate Chip cookies
We absolutely love this recipe.
Whole Wheat Chocolate Chip Cookies
1/2 C Flour
1 tsp Baking soda
3/4 C Sugar
1/2 C Applesauce
2 Egg yolks
2 C Whole Wheat Flour
1 tsp Salt
3/4 C Brown Sugar
1/2 C Butter
1 tsp Vanilla
Chocolate Chips
Mix everything together and cook for 13-18 minutes at 375 degrees.
I have tweaked this recipe a few times. With the applesauce you can cut out a little more of the sugar if you want. We still like a little sugar. If you cut out the sugar I would start in small amounts until you find what you like. These are very yummy and our favorites. I do warn you though if you like to eat the dough. This dough isn't very tasty but the cookies are. You can either buy whole wheat flour or grind your own.
I hope that you all enjoy these cookies. If you make them and like them let us know by leaving a comment.
Monday, December 20, 2010
Christmas Dress finished.
Ok so last time I posted I commented on 3 new projects that I was working on and wanting to get done before Christmas. One of them is finished, One almost finished, and one not started yet.


I started working on the Christmas dress last Monday and finished it yesterday before Church. It was really fun to make and even better when it turned out so cute. It is a little bit bigger than my daughter but that way she can wear it again next year.

Today I will finish her bathrobe and get the material cut out for the babies outfit. I also think I'll sew some tabs on one of the baby blankets so it will attach to the top of the car seat.
I'll keep everyone posted and pictures put up when things are done.
Thursday, December 16, 2010
Newest Projects
Sorry I haven't blogged much the last week or so. I've been trying to get as much done as I can before this baby comes. I've been trying to spend more quality time with my daughter, clean, sew, pack bags, finish getting things ready for Christmas, and doctor appointments.
This week after my doctor appointment my daughter and I went to Joann's to get some material for a Christmas dress and had so much fun. We spent over an hour in the store. I found 3 very cute patterns that I bought and then we had to get material for each of them.
 I started out looking for material for the Christmas dress first but just couldn't find what I wanted so we started looking for cute material for this outfit. I went over to the fleece and walked through the material and finally found a few that I liked and let my daughter pick which one it would be. She chose this pink material and I think it will be very cute.
 While in the fleece department I decided to get the material for this cute pattern. My husband and I found some very cute ducky slippers in the LTD Commodities catalog and they even make sounds when you touch the duckies. We ordered them for her for Christmas so I thought a robe would go nicely with the slippers. My daughter even picked out the ducky material without help from me. It was cute and she will love it.
 When I was done getting zippers and bias binding tape I finally pulled this pattern out again and started trying to decide what I wanted to do for the Christmas dress. The selection was getting smaller and smaller at Joann's so I wasn't left with much. I wasn't sure I wanted green and red and they had some cute black and grey material in the Christmas section but this snowflake material kept catching my eye. I asked my daughter if she wanted snowflakes and she did so we picked it out and then the long process for me of finding the lining material. I actually forgot the contrast material for the tie ends and had this pretty sky blue already in my stash. The dress I am making is the one second one down on the right that has sleeves and a bow. I still haven't decided on the bow yet. I have the top done and after looking at all the measurements for all the material I forgot to look at the Tulle. So tonight I will be going back for more Tulle to finish this adorable dress. I am very excited.
Since I didn't have enough tulle today I worked on the bathrobe and it was so easy and fast that in the 1 1/2 hours that my daughter slept I almost finished it. I decided I had better blog before I forgot again. I will take pictures and blog about the finished projects as soon as I finish each one.
I hope that everyone is ready for Christmas and enjoying this Christmas season.
This week after my doctor appointment my daughter and I went to Joann's to get some material for a Christmas dress and had so much fun. We spent over an hour in the store. I found 3 very cute patterns that I bought and then we had to get material for each of them.


Since I didn't have enough tulle today I worked on the bathrobe and it was so easy and fast that in the 1 1/2 hours that my daughter slept I almost finished it. I decided I had better blog before I forgot again. I will take pictures and blog about the finished projects as soon as I finish each one.
I hope that everyone is ready for Christmas and enjoying this Christmas season.
Tuesday, December 14, 2010
Tuesdays Recipe - Shepards Pie
Don't let the title foo you this is not a desert. :)
Shepard's Pie
3/4 - 1 lb Hamburger
1 Can Green Beans (Juice to)
1 Can Tomato Soup
Mashed Potatoes
Grated cheese (opt)
First you brown the hamburger and then add the green beans and tomato soup.
You should also make mashed potatoes. You can use real potatoes or dried potatoes.
Pour the hamburger mix into a 9x13 dish.
Top with the Mashed potatoes.
Sprinkle with cheese if you want.
Bake for 20 minutes at 350.
This dish is very easy and very quick to make. It can feed many people. It can be used as the entire meal or you can also make other sides to go with it. We make this fairly often because we really like it and it doesn't take too much effort on my part. lol.
Hope you enjoy.
Friday, December 10, 2010
My randomness....
So, I'm laying in bed last night and ask my husband...."When does winter actually start here (in Owasso, Ok)?" There was a pause and then he answered "This is their winter". Well that was a bummer because I love cold weather during the winter months but at the same time it will allow me to continue to exercise outside after the baby is born. There are days when it gets pretty cold and then after a couple days it warms back up to perfect weather. I am from Idaho and we get snow and ice and cold weather and I will miss it.
Here I hear that they get maybe a snowstorm a year and periodically ice storms. So we shall see. The other thing I'm noticing is that I can't seem to find any of the yummy chocolate oranges that are around for Christmas. I have looked at Walmart each week, CVS, and Walgreens. Someone recommended Target and low an behold they had them but all they had left was the mint ones. It is interesting how places are different. We actually really like it here in Owasso. Very nice town, not too big, and very nice people here. Lots of trees which hide the fact that it is fairly flat here.
I am so excited to start running again. I have already started looking for races next year. I would like to eventually run a full Marathon but I think my first goal will be to run half a marathon. I ran a 10K and loved it. My husband doesn't really like to run but is thinking about starting when I can start running. It would be so nice to run together.
Christmas is coming and we are so excited. Each year gets better and better the longer we are married. We are excited to watch Sarah come out and see the gifts from Santa on the couch. Last year she opened her gifts really well but now that she is older there should be more enthusiasm. She has done very good at not trying to open the presents under the Christmas tree. She periodically asks if she can and I tell her she can't until Christmas and she goes off and plays with something else. I think the fact that she knows she will get to open them is why she hasn't tried opening them yet. I'm sure each year will be different especially as we have more children.
Well I am 37 weeks and 5 days pregnant today and very much ready for this lil girl to come. Yesterday I was so tired and felt like I was getting sick and I felt like I did after I had had Sarah. I was so sore and achy. I got a few things done in the morning but the afternoon was pretty much dead. I can tell that she is cramped. Last night she was proving that. She has already dropped which should give a little more room but she was hitting my bladder and kicking my ribs at the same time. Normally she just bumps into my ribs periodically but it was like she was trying to tell me that she is way too cramped......I keep telling her that she is in charge of when she comes and Sarah keeps asking her to come out so she can see her. So if she is cramped it is her fault lol. Today I have had so much energy and although I still feel a little sore and achy it is not nearly as bad as yesterday. I am slowing down as the day goes on. I don't remember nesting with Sarah but I think I have nested this week. I started Wednesday and got some stuff done and yesterday nothing and then this morning I cleaned the entire house including showers and tubs, door knobs, floor boards, dusting, vacuuming, mopping, laundry, disinfecting, etc. I just keep finding things to do. I need to sew but I just feel like I should clean first.
Well I think I could ramble a book so I had better stop here.
Oh and I will probably not be posting anything else to my store until January. I will try to keep everyone updated on that. I am going to start sewing more table runners and leave the bibs alone unless I get any requests. I will start doing kitchen themes. Here are a few themes that I have come up with or have heard about : Apple, Rooster, Grapes, Pigs, Bears and outdoorsy. If you have any other ideas or know of any other themes please let me know so I have more ideas. I'll do each theme as I find cute material.
I am also thinking about making reversible holiday table runner for the upcoming holidays. I'll keep y'all posted as I am working on them.
Thursday, December 9, 2010
New posts to my store
Ok well you saw a picture of the different towels that I was turning into pull over bibs. Now they are finished and posted at my store. Come check them out. They turned out very cute. I went with a different softer towel than normal and loved it. I think I will stick to that in the future. They shed a lot but when I was done serging they stopped shedding.


I have listed 4 new pullover bibs. One pink baby girls bib, one pink striped toddler pullover bib, one solid red bib that can be used for girls or boys, and one green striped bib.
They are great to have at your house for your own children or if you babysit. If you watch your grand kids they are also great to have on hand. They are all machine washable and very durable.
They have knit collars so they are soft on the neck and very easy to put on and off.
Come check them out and spread the word.

These are only two of the 4 bibs. Check out my store to see the other two. www.IdahoAtHeart.etsy.com.
Wednesday, December 8, 2010
I finished three Christmas presents.

The middle one has butterflies.
The bottom one has flowers growing out of the pocket. They were fun to make and I'm learning more and more about appliques.
I hope to make more like these for my store but with Christmas right around the corner I think it will have to wait until the new year.


Tuesday, December 7, 2010
Tuesdays Recipe - Tater Tot Casserole
If your looking for an easy dinner try this. There are two ways to make it and both are delicious. The ingredients are the same just made a little differently.
Tater Tot Casserole
1 pkg Tater tots
1 Can Cream of Mushroom Soup
3/4 - 1 lb ground beef.
Grated cheese
1st way: Brown the burger then mix in the cream of mushroom soup.
Add a little water so not so thick.
Put in greased 9x13 pan.
Layer tater tots on top of meat mixture. Grate cheese on top.
Bake for 20 minutes at 350.
2nd way: Do not brown burger. Spread out on bottom of 9x13.
Chop an onion and mix with the Cream of mushroom soup. Pour mixture on top of burger.
Salt and pepper. You can add green beans or corn at this point.
Layer the tater tots on top and grate cheese on top.
Bake at 350 or 375 for 40-60 minutes or until burger is done and tater tots are cooked.
Either way tastes really good. I started making it the second way so I didn't have to brown the burger first. You can also shred cheese under and over the tater tots. I say 350 or 375 because I haven't fine tuned it yet. Basically you cook it until the burger is cooked and the tater tots are done.
You can eat this as an entire meal or as a main course and cook other vegetables as the sides. Hope you enjoy. If you try it and like it let me know.
Monday, December 6, 2010
New Toddler Pullover bibs available now.

I just finished four new Toddler pullover bibs. They are available at my store. Two are white with red and grey stripes and two are white with blue and green stripes. They can be used for boys or girls. They are made from kitchen towels and have been pre-washed. The color is made from knit so it stretches.
They make great gifts to people who have toddlers or to grandparents. They are great to have on hand when food is involved. My daughter hates wearing the ones with ties, snaps or Velcro. She was always pulling them off. These pullover bibs however are so nice because she feels so independent. She can put them on and take them off by herself and where she has favorite shirts now she doesn't like to get them dirty.


Sunday, December 5, 2010
A new Treasury on Etsy.
With all the Christmas talk and buying presents for Christmas lets not forget that there are a lot of people including children who have birthdays this month. Here are some cute ideas to help get you all started with those wonderful birthdays. Boys and girls alike are represented in this treasury.
http://www.etsy.com/treasury/4cfc6cf174626d9133675027/childrens-birthdays-in-december
Come check it out and spread the word to help others find those gifts as well.
http://www.etsy.com/treasury/4cfc6cf174626d9133675027/childrens-birthdays-in-december
Come check it out and spread the word to help others find those gifts as well.
Saturday, December 4, 2010
Pullover Bib Tutorial
This is a post where I show you how to make pull over bibs. I do sell them at my store to make things simple but for those of you who like to sew and learn new things. I thought I would share this with you. I have broke it down into 12 simple steps with pictures.
Pick your towel. The one in this tutorial is a hand towel from Target. It was the perfect size for a baby pull over towel. You can also cut bigger towels into smaller ones to make more.

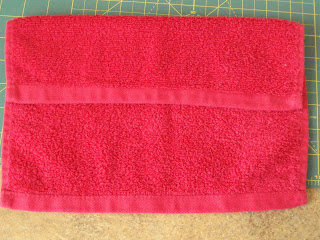


Step 1

Step 2
You need to decide how much of the bib you will want on the back of the head and then fold it that much.

Step 3
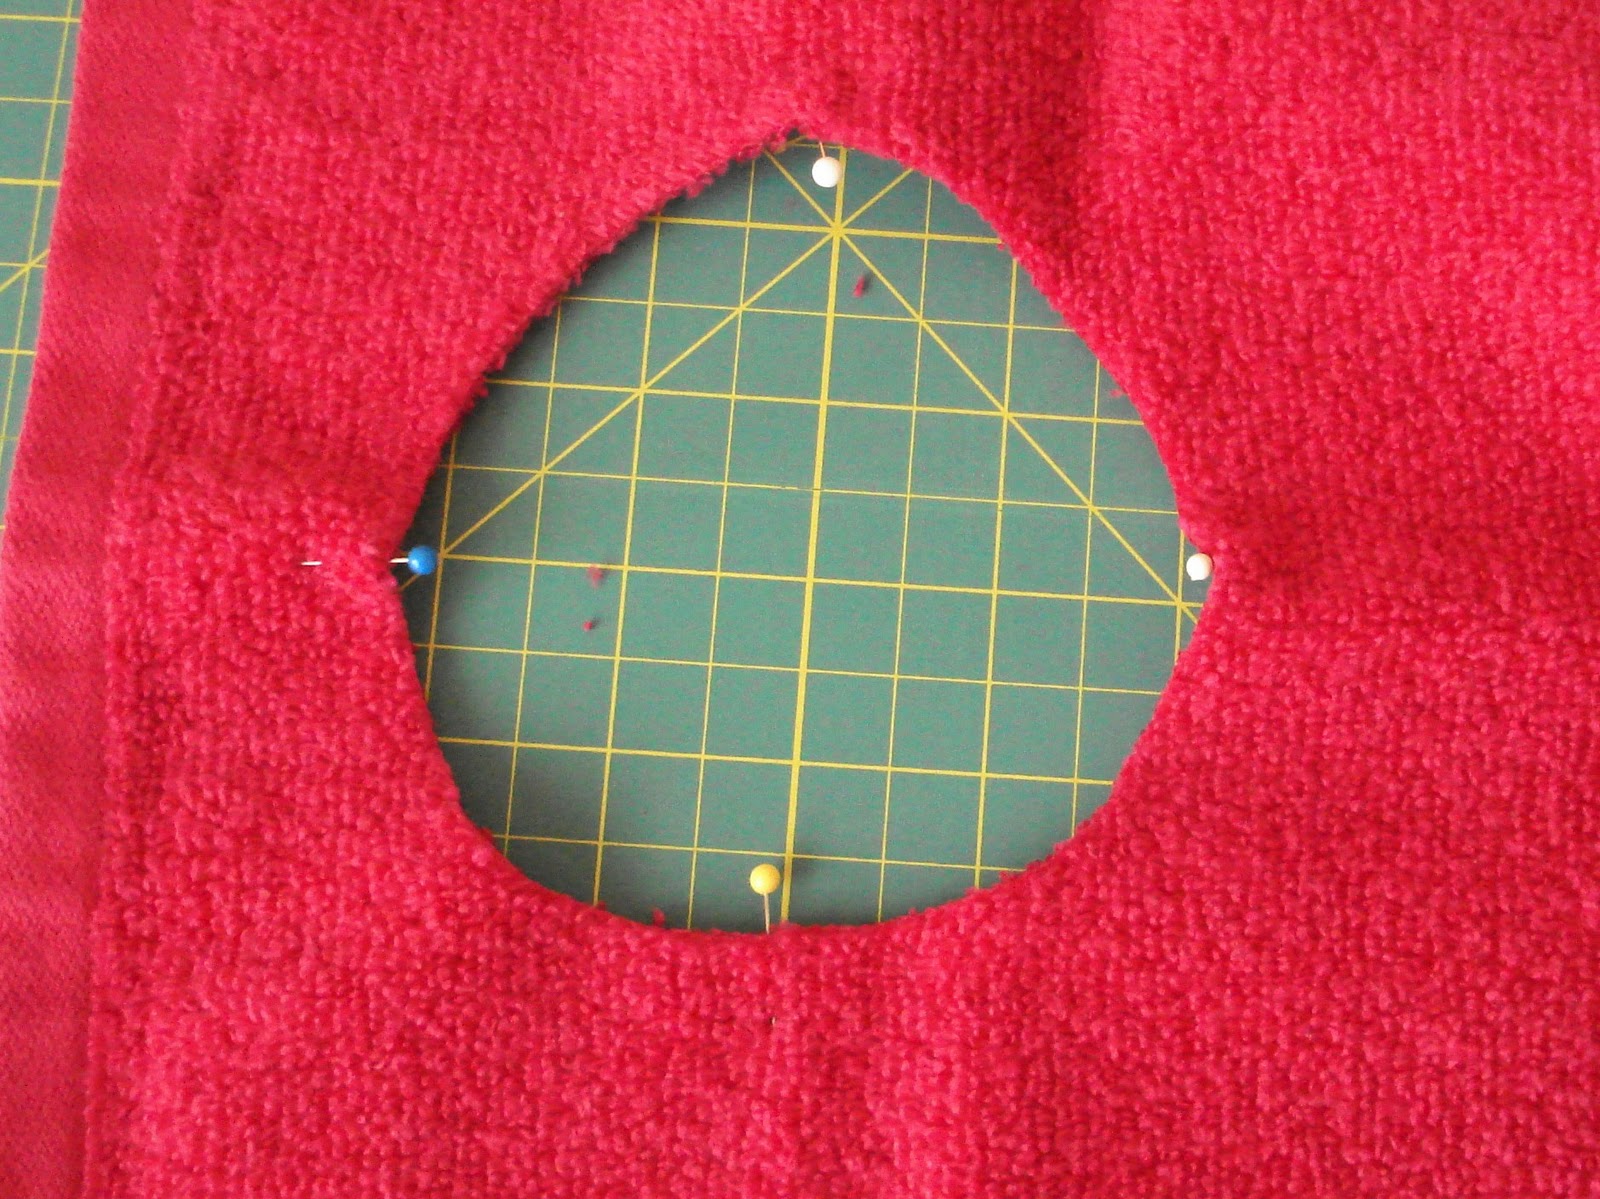
Before this step you need to decide how big your neck hole is going to be. I have mine drawn out on parchment paper. You only need to draw half of it and then place it on the fold and pin in place.

Step 4
Once you have it pinned in place. Cut the hole out.

Step 5
Now you need to mark it evenly into fourths. If you mark it while it is already folded and then match those pins in the opposite direction and mark the other sides it works really well and quickly.
Steps 6 & 7

Then you need to measure out the knit. It needs to be 3/4 of the measurement plus 1 inch. If you measure from one pin around to the last pin, leaving a gap between the last pin and the first it works really well.
Then you need to fold the knit in half and serge the end closed.

Steps 8 & 9

Know you open up the knit and fold the edges up together. Then you need to also pin it into fourths. The serged edge can count as 1 of the fourths. Then you match the pins up on the knit necking to the pins already marked on the towel.

Steps 10 & 11

Now you serge around the neck edge. Make sure you stretch the towel to match the knit. Keep all the edges nicely lined up. When you get to the start - keep stitching for about an inch. Then stitch until you get a tail so you can finish off the threads.

Your finished and it looks great.

Now that you have finished serging just check the top side to make sure that you don't have any bunches and that you haven't missed any parts of it while serging. When you iron it just don't iron the folded edge of the knit and it will look really good. Now you can embellish or leave as is.
Some other options

Something else I like to do is buy the bigger towels and cut them in half. Then you can fold and sew the cut edges and make two of the toddler pull over bibs out of one towel.

I hope that you have enjoyed the tutorial. Like I said, I do sell them at my store for your convenience. If you have questions please feel free to contact me. The bib seen in the tutorial is a baby pullover bib and will be available Monday in my store so come check it out.
Friday, December 3, 2010
I finally finished the Cushions!!
Ok so I know that a few weeks ago I posted a picture of a cushion that I was planning on covering. We have two cushions and we bought enough material to cover both of them. We ended up standing them up in the corner in the living room so I wouldn't forget they were there. Well a week or so went by and I hadn't even started on them. I had other projects that I deemed more important. One weekend my husband really wanted me to work on them so he took care of our daughter and allowed me pretty much the whole day to work on it. After a few trials and errors I finally got one finished and figured out how to do it. I figured that the second one wouldn't take more than a couple of hours to sew plus the time to cut the material.
So my original goal was to have them both completely done by the end of November and I was one day late. So I can't be too hard on myself. They turned out great and we love them.


 I learned a lot from sewing these. I learned that sewing 3D isn't as hard as it may appear but it just takes time and thinking before acting. That was my problem with the first one and the trials and errors. I would sew and then go "oops" ad start picking.
I even have some left over material so I might be making some other cushions with the left overs.
So my original goal was to have them both completely done by the end of November and I was one day late. So I can't be too hard on myself. They turned out great and we love them.

We used heavier more upholstery like material and stronger thread on them so they would last. We did stripes on the top and sides and solid colors on the bottom. One has a brownish cream color on the bottom and the other has a dark brown on the bottom. We wanted them to match but the store only had so much of each material. In my measurements I added just a little to allow for pulling on the material when moving around on them. That is the ripples that you can see in the pictures but when you lay on them it tightens up but doesn't rip anything and it allows for the movement.

I also put a zipper in it. The original cushions that my Grandmother in law made didn't have zippers and they worked great but we would wake up with a gap in between the cushions and one of us would inevitable be sleeping in that crack. So I sewed a sleeping bag zipper to them. When we zipped them up we were very proud of our idea. They will not be spreading apart any time soon. Also because of the placement of the zipper they fold on top of each other without having to unzip them for a double layer and for storage under our bed.

I even have some left over material so I might be making some other cushions with the left overs.
Wednesday, December 1, 2010
Tuesday's Recipe on Wednesday
Sorry for going MIA for the last few days. I have had no energy and when I do have energy I've been finishing up some Christmas gifts and spending time with my daughter.
The recipe that I want to share today is one that I hadn't eaten in probably 8 years. My mom used to make it after we would cook a turkey - so usually after Thanksgiving. It is a good use of left over turkey. I don't know what the original recipe is so I'll call it:
The recipe that I want to share today is one that I hadn't eaten in probably 8 years. My mom used to make it after we would cook a turkey - so usually after Thanksgiving. It is a good use of left over turkey. I don't know what the original recipe is so I'll call it:
Broccoli, Turkey and Rice dish
Turkey cooked
Broccoli
2 C rice cooked
1 Onion chopped
2 Cans Cream of Chicken soup
1 1/2 C sour cream
1 C butter
Sunflower seeds
1/3 C lemon juice
Ritz or saltine crackers
Shredded cheese
You can use as much or as little turkey and broccoli as you want. My mom used to put the turkey in sandwich bags and freeze them. Her recipe calls for one bag from the freezer.
I bought the broccoli prepackaged at Walmart. It came with two heads. Chop the broccoli up into smaller pieces and boil until soft.
Add turkey and onion to the broccoli and cook.
Once everything is cook mix together in bowl with sour cream, cream of chicken soup and 1/2 C butter.
Also add sunflower seeds if you want them - I added about 1/2 C, and Lemon juice.
Pour mixture into cake pan and shred the cheese on top.
Crumble the crackers and spread on top of the cheese.
Melt 1/2 C butter and pour over the top.
Cook for 1/2 hour at 350 degrees and then enjoy.
This recipe is very tasty. I really enjoyed it and it made lots of leftovers. We had it last night as the whole meal and were very satisfied when we finished eating. You could also make a side if you wanted and spread it out farther. It is really easy to make. It takes just a little bit of prep time to get everything chopped and cooking but not too bad.
As for things in my sewing room. I have a few more Christmas presents to get sewn and then I'll be back to sewing things for my store. The first thing to be sewn will be the toddler and baby pull over bibs that I have already started. I might throw one or two into the mix just to post a few things. Hope that you all have a wonderful week.
Saturday, November 27, 2010
Recent projects - Snowman Table Runners


They are both quilted and I have done my free motion stitching on both of them. The binding is machine sewn with stitches that somewhat resemble snowflakes.
I had made a few of snowman table runners over the past year and have gifted some and sold one and had a request to make more. So I pulled out my snowman material and started making more. I was just going to make one and decided to make two. I keep thinking about taking pictures of the different processes but then I get into sewing and forget until I'm done so you just get pictures of the finished projects.
I hope that you have all had a wonderful Thanksgiving weekend and that you all have a wonderful Christmas. We have all of December to be thinking about Christmas and what it really means. I love decorations because they remind me what time of year it is and helps remind me also that Christmas isn't just one day a year but that I can be thinking about it for a while.
Wednesday, November 24, 2010
Have a happy Thanksgiving everyone.
Well Thanksgiving is tomorrow. I know some have celebrated sooner so they could spend it with their families and others will celebrate it later for the same purpose. It doesn't matter when you celebrate it I hope that you have a wonderful Thanksgiving and that you are able to spend it with family and friends.
We will be staying here at home. Our family is in Idaho and California and me being 35 weeks pregnant we decided to stay home. Throughout the month I have added to each weeks grocery list a few items that will be needed so this weeks grocery bill wasn't through the roof. It worked really well. We have a good size turkey and will have lots of leftovers.
I know that everyone has their own traditions of what they like to eat for Thanksgivings. We have turkey, mashed potatoes and gravy, sweet potatoes with marshmallows, olives, rolls, stuffing, sometimes ham (just not this year), pumpkin pie, pumpkin cookies, and sweet potato cheesecake. I made the cookies last night and today my husband and daughter will me with the pies and then tomorrow we will make the rolls.
We are looking forward to Thanksgiving and are very thankful for everything that we have. I'm thankful that my husband doesn't have to work tomorrow or Friday. I'm thankful that my daughter is feeling better and getting over her head cold. I'm thankful that although our family is in Idaho and California we are able to communicate with them very easily because of technology today. I am thankful for our good health and for the love that we have in our family. I'm thankful for my husband's job and all that it provides for our family. I'm thankful for our college education and our common sense. I'm thankful for the house that we live in, the good neighborhood and the friendly neighbors.
I could go on and on and on. I just really wanted to wish everyone a happy Thanksgiving no matter where you are or what you are eating if you have at least one thing to be thankful for it will be a good day.
Happy Thanksgiving.
Tuesday, November 23, 2010
Tuesdays Recipe - Sweet Potato Cheesecake
This weeks recipe is a desert recipe and one of my favorites. My cousin found this recipe several years ago and shared it with me then and I make it every year now. It is not a hard recipe and very very yummy. Even if you don't usually like Sweet potatoes be sure to try it. I know many people who hate sweet potatoes and love this cheesecake.
Sweet Potato Cheesecake
2 (8 oz) packages Cream Cheese
1 C Sour Cream
1 C mashed, cooked Sweet Potatoes
1 C Brown Sugar
1 Large Egg
2 Large egg whites
2 tsp Vanilla flavoring
2 prepared graham cracker crusts
Prepare oven to 350 degrees.
In a large bowl beat together cream cheese and sour cream until creamy.
Add sweet potatoes and brown sugar.
Add egg and egg whites one at a time beating after each addition.
Add vanilla.
Spoon mixture into crusts.
Bake 40 to 50 minutes or until set in the middle. Remove from oven to cool.
Refrigerate for about 2 hours before serving.
Tips: Let cream cheese sit on counter for a couple hours to soften so it is easier to mix with Sour Cream.
I use the canned sweet potatoes and microwave them so they are warm and easier to mash.
You can put whipping cream on the top or eat plain.
I would check the pie at 40 minutes but be prepared for it to take a while longer. Sometimes it takes an hour. It does raise quite a bit but then when done and cooling it settles back down a little.
I really like this recipe and it is very yummy. It really doesn't take long to make and makes 2 pies at one time. If you try it leave us a comment and tell us what you think. I'll try to remember to take a picture when I make mine tomorrow and post it.
Monday, November 22, 2010
Welcome to my sewing room.
Ok so I forgot to take the before pictures to show you what a mess my sewing room has been the last week or two. I just get it cleaned and it feels like when I turn my back it becomes a mess again. We live in a 3 bedroom house and the 3rd room is my sewing room. It is also the room where everything ends up. I have been stacking Christmas presents, wrapping paper, tape, boxes, sewing projects, scrap booking projects and any other projects that come my way in here. It gets a little crowded with everything all over the place.

 This morning as I was trying to sew on some toddler aprons I had had enough of the mess. So I cleaned it up. I organized and put things where they belonged. Now I can see everything and everything is in it's place. So welcome to my now mainly clean room. There are still a few things lying around but I am using them in immediate projects so they are still sitting where they were to begin with.
Have a good day.


Have a good day.
Saturday, November 20, 2010
KWN Boutique
I just wanted to take a blog and tell you all about a friend of mine. She is a mother of two. She has a son and recently had a daughter. She is a wonderful cook and not only does she make and sell hair accessories on Etsy but she is a very good photographer.
Check out her store on Etsy to see what she makes. http://www.akneale.etsy.com/. She makes them herself, photographs them herself and then sells them. She has a couple deals where you get one for mommy and daughter and they are very cute. She also has one and can make more on bands for babies and children. If you like flower clips and hair accessories check out her store. She also makes brooches and pins. They are very nice and very well made.
If you like her photos, like I said she is also a photographer. She has a blog with information about her photography and she does take very good photos of families, newborns, and other photos that you may need taken if you are in the area. Check out her blog to see her photos and check out her pricing. www.kwnphotography.blogspot.com/.
If you want to see some of her photos you can check out my store. She took the pictures of my table runners for me. She is very good at what she does and very nice to work with. Hope you enjoy her blog and her store.

 Here are just a couple of the photos that she took for me. Enjoy
Check out her store on Etsy to see what she makes. http://www.akneale.etsy.com/. She makes them herself, photographs them herself and then sells them. She has a couple deals where you get one for mommy and daughter and they are very cute. She also has one and can make more on bands for babies and children. If you like flower clips and hair accessories check out her store. She also makes brooches and pins. They are very nice and very well made.
If you like her photos, like I said she is also a photographer. She has a blog with information about her photography and she does take very good photos of families, newborns, and other photos that you may need taken if you are in the area. Check out her blog to see her photos and check out her pricing. www.kwnphotography.blogspot.com/.
If you want to see some of her photos you can check out my store. She took the pictures of my table runners for me. She is very good at what she does and very nice to work with. Hope you enjoy her blog and her store.


Wednesday, November 17, 2010
What are you thankful for?
Ok as I have been reading some other blogs lately I have seen a few of them making lists of what they are Thankful for. I want to invite each of you to leave a comment of what you are thankful for. If can be one thing or a list of things. I know that I am thankful for everything I have. I am thankful that my daughter has finally figured out the potty training thing and is doing really well. I'm thankful for my husbands job, for our house, for the nice neighborhood where we live. I'm thankful for friends made here in Owasso and friends around the world. I am very thankful for my family and the love that we have for each other. I'm thankful this pregnancy is going so well and has been worry free. I'm thankful for all my talents and the talents of my family members.
I could go on and on and on but I want to invite you all to share what you are thankful for. You are welcome to comment more than once. Thanksgiving is next week. Lets see what kind of a list we can get of what we are all thankful for by then.
I could go on and on and on but I want to invite you all to share what you are thankful for. You are welcome to comment more than once. Thanksgiving is next week. Lets see what kind of a list we can get of what we are all thankful for by then.
Tuesday, November 16, 2010
Tuesdays Recipe
This weeks recipe is one that I learned how to make from my mother in law. It is very good and very easy. It is again a Crock Pot recipe. There are 3 main ingredients and then you can add what you want. We ate it Monday night and I remembered why I liked it so much.
Chicken & Salsa
Chicken Breasts or tenders (no skin or bones)
Bottle of Salsa (whatever you prefer)
1 Package of Cream cheese
Place the chicken and Salsa in the slow cooker and cook all day on low setting.
Chicken can be frozen (mine usually are).
About 30-60 minutes before dinner shred the chicken and add the Cream cheese.
You can eat it over rice, noodles, tortilla shells, etc.
We tend to eat this in tortilla shells with rice and cheese. You can also add sour cream.
This is a very easy recipe and can be changed for every one's preferences. You can get hot or mild salsa, fat free or regular cream cheese and whatever kind of chicken you want. We like to eat the whole wheat tortilla shells and it makes it that much healthier a dish as well.
I hope that you are enjoying the recipes. I will add in some deserts as well later. Thanksgiving is coming and I have some deserts that I love and I'll share them soon.
Monday, November 15, 2010
Recent Projects
Sorry that there are no pictures today. Several of the projects that I have finished are Christmas presents so I will post the pictures after Christmas. I don't always have tons of time to sew. My daughter naps from about 1-3 most afternoons and that is when I take time to sew. I also find a little time after her naps but it really depends on the day. Thursday I was able to finish my biggest project and able to spend more time on other projects.
If you remember the sleeping cushion project I started a week or so ago, I was able to spend quite a bit of time working on that. In fact I finished one of them and now need to start on the other cushion. I will post pictures when they are both done so you can see the zipper addition. The first one turned out really well I think. I learned a lot. It was the not the first time making a 3D object but it was the first of it's kind. There was a lot of picking and resewing and testing and pin pricks in my fingers. But it is now done and the second one shouldn't take nearly as long.
I also have been working on more children's aprons. I just need to applique cute things onto them and then I will be able to mail some off as gifts to friends and others will be posted at my store.
Today I started working on our Christmas tree skirt. It is going to be reversable and very cute...I think. It has also given me a lot of ideas for Christmas Tree skirts to sell on my store. I hopefully will have the first one sewn and posted here so you can see by the end of this week.
I also had a request to make another Snowman table runner so I will also be working on that.
I have so many ideas and projects that I want to work on and I know that I have to prioritize in order to get them all done when they need to be done. I will not be making any more Fall table runners for this year. With time running out I just wont get them ready for Thanksgiving. So I will work on the snowman table runner and then I am going to look ahead at upcoming holidays as well as birthdays and plan for them.
I will be making another trip to Joann's to pick up more material next week, I think.
It has been a good couple weeks and things are finally getting finished.
Thursday, November 11, 2010
Adult Aprons I have sewn
Well now that certain birthdays have come and gone an people have received their presents I can now share them with you. I once saw some very cute aprons made out of recycled overalls. You cut off the back and cut off the legs to the length that you want. You then have to sew the legs together in the middle. You also cut off the overall straps and sew them together in order to hold your apron up around your neck without having to have something to tie.


Then you find other colors and gather them and then sew them onto the bottom of the apron where the legs used to be and you can add applique or embroidery to the aprons as well. You find cute material and make a tie for the waist. I generally pull the waist tie through the belt loops but there has been a few times when there hasn't been belt loops so I just run them through the button holes on the side. They turned out very cute. Pardon the pictures. I wasn't planning to post them to my blog when I took them.


This apron I made for my Sister in law. I used purple for the waist tie and then scraps of material to make it look like it had been patched.
For the bottom colors I used a blue and green stripped frog print and then the very bottom color is just white.
Because they are made from overalls they already have pockets and places to put things if you need the space. I think it turned out really cute.

This apron was one that I made for my other Sister in law. I used pink for the waist tie on this one and for the bottom two colors I used grey and a purple material with different shapes in it. The bottom material actually originated with her. It was part of her sheet set. She doesn't use the flat sheet so she gave it to me. I then made a blouse out of it but had plenty extra lying around and thought it appropriate to share it again with her.
I wanted to try embroidery so I embroidered a few flowers on it here and there and along the bottom is this saying:
I had a lot of fun making these aprons and have made others. They are all very different from each other and as I get more and more creative I try more and more things. I hope to be able to put some for sell at my store but that will probably have to wait a month or so. Christmas is coming and I'm trying to keep up with all the Christmas gifts, baby showers and sewing new things for my store.
Tuesday, November 9, 2010
Tuesdays recipe......
As I have thought about what to blog about I decided to make Tuesdays a day when I share a favorite recipe. This is the first week and the recipe that I will be sharing is one of my favorites and very very easy to make. It is for a slow cooker but I do know people who have just simmered it in a pot on the stove.
Chicken Taco Stew
1 Chopped Onion
1 16 oz can Black Beans
1 16 oz can Kidney Beans
1 16 oz can corn (drained)
1 8 oz can tomato sauce (or a can of tomato soup)
2 14.5 oz cans diced tomatoes with chilies
1 1.25 oz packet Taco Seasoning
1-2 boneless skinless chicken breasts (or as much as you want)
Ok, once you have everything rounded up and the onion chopped you are ready to prepare the stew. You take all of the ingredients, except for the chicken, and mix together in your slow cooker. Stir everything together really well and then place the chicken on top. Do not cut it up and it can even be frozen (mine usually are). You just place it on top and put the lid on. Cook on low for 6-8 hours or high for 3-4 hours.
30 minutes before you are ready to eat dinner remove the chicken and shred it. Then return it to the stew and stir. Then let it cook for the remaining 30 minutes.
We like to add cheese and sour cream to our bowls when serving it. You could even eat it with tortilla shops.
History
I actually found this recipe two years ago when my husband, daughter and I were living in New Mexico and I was trying to lose weight. I had found a web page (www.sparkpeople.com) and that is where I found the recipe. It has fast become one our favorites and we eat it often. There are a lot of good recipes that I have found on Spark People that I will share over time.
I hope that whoever tries this really enjoys it.
Monday, November 8, 2010
New baby pullover bibs are now available in my store.

With Thanksgiving coming up soon these could be a lifesaver to whoever buys them. There are two available. This one is actually sitting on one of the two Fall tablerunners that are left in my store. Come check them out. They make great gifts for children or grandchildren. They are also just nice to have on hand at grandparents houses for when children come to visit.
Wednesday, November 3, 2010
Sharing our experiences with each other.
Growing up I didn't see a lot of sewing going on around me. My mother liked to Cross stitch and Toll paint and is very good at both. I was in highschool when I discovered that I like to sew and a few years later I bought a simple sewing machine and a few years and classes later I traded that simple sewing machine in for a newer, upgraded one. I am still learning and will continually be learning. I would like to share what I learn with you and would like to ask you to share what you are learning with me.
If you craft in any way whether it be sewing, knitting, scrapbooking, etc and would like to share what you have learned please email me at IdahoAtHeart@gmail.com. I would love to share your thoughts with those who read my blog. I'm still learning about blogging and guest blogging so if I can't figure out the guest blogging part than I will post your thoughts for you and make sure that you receive the credit for the information. Please let us know what you are learning. I believe that we can all learn from each other.
If you craft in any way whether it be sewing, knitting, scrapbooking, etc and would like to share what you have learned please email me at IdahoAtHeart@gmail.com. I would love to share your thoughts with those who read my blog. I'm still learning about blogging and guest blogging so if I can't figure out the guest blogging part than I will post your thoughts for you and make sure that you receive the credit for the information. Please let us know what you are learning. I believe that we can all learn from each other.
Tuesday, November 2, 2010
Trying something new

This padding is 72" long and about 25" wide. We bought two of them so we could put them side by side in the tent and sleep next to each other. The one thing that we have not liked so much about the one's we had been using is that we would wake up in the middle of the night with several inches between the pads and one of us was usually in that gap. So I decided (after asking my husbands thoughts) to buy a sleeping bag zipper and to sew one side of the zipper to each pad so we can zip them together - making it much harder for them to separate. He liked the idea and even helped me pick out the fabric and the zipper.
Yesterday I cut the material for the top of one of them and I now need to get the bottom cut and start sewing. We are very excited to see how this works. Check back later to see the end results!
Saturday, October 30, 2010
Poll results are in.
Ok you know I have been running a poll for the last week here on my blog. It ended yesterday so I thought I'd share the results with you. The question was: What would you buy on the internet? There were 4 choices and it was multiple choice. It was mainly a poll to help direct what I might sell at my etsy store.
So here are the results:
14% voted for Adult Clothing
57% of the votes went to Home Decor and Children's Clothing.
71% of the votes went for Gifts.
Ok so I'm going to ask for your ideas. I will be starting a new poll each week to help me discover what kinds of things in each area you would look for online. If you have more ideas than what you can vote on please feel free to leave comments here or on my facebook page. I want to offer what people want so I need your help.
Wednesday, October 27, 2010
Grocery Sac Holders
I was shopping this morning and saw two cute dish towels so I bought them and turned them into Grocery Sac holders. I made myself one when I got married and still have it. We like to save our grocery sacs and use them in our smaller garbages and these holders make it easy and cleaner to keep them. One is Red and gold striped and the other is Green and gold striped. My sister in law has 2 in her college apartment and loves them and her room mates use them as well.
They are 100% cotton and machine washable. They have an elastic band in the bottom to help hold the sacs inside and a drawstring at the top to make loading the holders easy. If you know anyone who likes to save the sacs and needs a way to keep them this would make the perfect gift.
.JPG)
.JPG) I also just added another Taggie to my website. Come take a look.
I also just added another Taggie to my website. Come take a look.
They are 100% cotton and machine washable. They have an elastic band in the bottom to help hold the sacs inside and a drawstring at the top to make loading the holders easy. If you know anyone who likes to save the sacs and needs a way to keep them this would make the perfect gift.
.JPG)
.JPG)
Tuesday, October 26, 2010
Taggie Blanket

The material was on sale when I bought it so I am passing the savings on to whomever buys this Tagge. It is made of neutral colors so it could be used for a boy or a girl. They make great baby shower gifts or just great gifts in general.
As the babies grow the Taggies can still be used for their dolls and to help teach them colors. They are small enough that they can be taken anywhere without taking up much room.
I have one that my mother in law made for my daughter who is due in December and I can't wait to use it.
Monday, October 25, 2010
Too Much To Do?
Do you ever feel like you have WAY to much to do? I think my problem is that I have so much that I want to do and I want to do it all right now. I have so many projects that I want to start and I know that if I start more than one or two than none of them will get done in a timely manner. So I decided to prioritize....kind of. :) Christmas is coming up and so are some birthdays in my family so today I am working solely on the gifts for those people. Tomorrow I will resume working on items to sell but if I let my store take over than I will never get anything for my family and friends done on time and possibly ever. Today my goal is to get two gifts finished and one other one worked on. So far so good. I have worked on the larger one and am about to start on the two other gifts.
Even with all of this I still need to make sure I am spending time with and teaching my daughter every day. We are also going to put her cute apron on and make some banana bread to use up some bananas that are ready for it. Some I will save in the freezer, some I will share with friends and one at least for now will be eaten. We will also run around the living room rather than go to the park because the wind is really bad today. We will probably play with her blocks and build a ramp out of her books for her cars. Then later we will cook dinner. A busy day but I believe I can do it since I prioritzed.
Even with all of this I still need to make sure I am spending time with and teaching my daughter every day. We are also going to put her cute apron on and make some banana bread to use up some bananas that are ready for it. Some I will save in the freezer, some I will share with friends and one at least for now will be eaten. We will also run around the living room rather than go to the park because the wind is really bad today. We will probably play with her blocks and build a ramp out of her books for her cars. Then later we will cook dinner. A busy day but I believe I can do it since I prioritzed.
Saturday, October 23, 2010
Toddler Boy Apron
.JPG)
Toddler Girl Apron
Ok so I have finished my first toddler girls apron and I must say that I think it is very cute. This one is made with a darker levi. It has pink bias binding tape on the edges and then a black sparkly pocket that has butterflies on it. Then there is also a flower that has been appliqued to the apron.
 My daughter loves the apron that Grandma made for her. She uses it when she is playing in her kitchen and when she is helping in my kitchen. She has also used it when we were carving our pumpkins. They are very durable and machine washable. Check out my store for more pictures.

Learning new things.
I have been sewing on a quilt on and off and I finally got to put the borders on and learned something that will make my life easier in the future. I thought I'd share what I learned with you. The instructions for the quilt border was to sew all the border pieces together in one long strip and then measure the two sides and then cut the measurement and sew them on. Then I was supposed to measure the head and foot of the quilt including the border and cut those measurements and sew them on.
Did I do this? Well no, I didn't. Instead I decided rather than cut them to the measurements that I would come up with I would just leave it all connected and sew it to one side and then using my rotary cutter and a ruler I cut off the excess material and then did the same for the other three sides. I made sure to iron the seams to be accurate and it worked out amazingly. I decided to try it this way because I tend to measure one thing and then when I cut the material and sew them together they don't always match. This way they match perfectly. It also seemed to cut out an extra step that wasn't so necessary.
It was very fun. I was very confused when I first read the directions but after trying and altering the instructions a little it worked out very well.
Friday, October 22, 2010
Fashion Show
A few weeks ago I had been invited to a 'MyVintage Baby' fashion show. To be honest I wasn't really interested in the fashion show as much as I was in the opportunity to hang out with friends and meet other women in the area. I wrote the date and time on my calendar, put the invite on my fridge and told my husband about it. I was going to make sure that I would be there and my husband was very supportive.
So last night I walked around the corner to my friends house where the fashion show would be and had a wonderful time. I was able to meet ladies in my neighborhood whom I had not yet met. I was able to share my website with a woman who loves aprons and just have fun looking at the clothing that was offered.
They have a lot of cute clothing that gave me some ideas for future projects. It was all together a wondeful evening.
It is amazing what trying new things can do to uplift us.
Wednesday, October 20, 2010
Toddler Aprons in progress
.JPG)
.JPG)
.JPG)

Subscribe to:
Posts (Atom)